Tag

karpfen angeln

Browsing

Don’t throw away the water in which you have boiled boilie

In the water in which we boiled the boilies there are a few traces and flavours of the ingredients from which the boilies are made. Most anglers use different types of seeds (corn/maize, hemp, tiger nuts, wheat, barley, buckwheat, chickpeas, lentils, bird seed mix and many more) for fishing, so this is a great opportunity to soak seeds in the water after boiling boilies.

The process of soaking and cooking the seeds is very easy:

First put the desired amount of seeds into the water but make sure that the seeds are covered with water (ratio 1 : 2, seeds : water). It may happen that the seeds absorb all the water in a few hours. Depending on the type of seed, as some absorb more water than others. In this case just add water and mix the seeds with spoon for better water absorption. It is very important not to cover the container in which we soak the seeds (various gases come from seeds). The time of soaking the seeds is very different (from 0 to 48 hours), it depends on the type of seed. We can also add various additives to the water, but I don’t think that’s even necessary.


One example: a tiger nut is soaked for at least 24 hours (best 48 hours), lentils are soaked for 1-3 hours.

Once the seeds are soaked it is time to cook. Also the cooking time of seeds is very different. Some seeds are cooked after just a few minutes (wheatbuck), and some take more than 40 minutes (tiger nuts) to cook.


How do we know if the seeds are cooked? Very easy to check by taking one or two seeds out of the water and trying to cut it in half with your fingernails or fork. If it goes very easily apart it is cooked. There are some exceptions such as the tiger nut, which is also cooked with a fingernail or fingers quite difficult to halve.

When the seeds are cooked, leave them in hot water and cover with a lid. When the seeds have cooled, they usually absorb additional liquid, so it is important that the seeds are covered with water. When the seeds cool, remove the lid on the container.

If you do not go fishing in the next few days (of course we need to store them in a cool place or refrigerator), store the seeds in the freezer until the next fishing. Before use, just put them out of the freezer about 12 hours before.

In this way we can prepare excellent fishing bait in an easy and cheap way. Now that we have boilies and partickles we are ready to go fishing.

Tight lines!


Disclosure – if you buy anything using links found in this blog post, I may make a small commission. It doesn’t cost you any more to buy via these affiliate links – and please feel entirely free not to do so of course – but it will help me to continue producing content. Thank you.

Well, we’re going fishing, fishing gear and food packed……….

This year’s winter temperatures are quite high but also very windy and rainy in my country. When I was planning to go fishing the weather got worse (as usual with a strong wind) and I had to postpone fishing several times. The forecast for Sunday was 16 degrees and sunny, the perfect day to go for my first winter fishing this year. Finally, I go fishing.

And Saturday came and with it the change of weather for Sunday (again a strong wind and showers). my boyfriend and I quickly decided to go fishing Saturday. Better a few hours fishing than nothing. We get our fishing gear quickly in the car and go fishing, finally.

When we got to the fishing spot I first prepared a groundbait for carp fishing. I have already prepared a groundbait dry mix at home (a combination of different ready-made mixes and other ingredients). I added some pellets and a little amount liquid krill additive to the mix. I slowly added lake water to the mix (mix thoroughly until a nice consistency and texture is achieved).

When you add water to the mix, you should always use the water from your fishery . Due to the different chemicals, I do not recommend that you use tap water or at least boil it before use.


While the groundbait was slowly getting wet, we prepared fishing rods and everything else needed to finally start fishing.

When we started fishing, the wind started to blow more and more. Hoping that the wind won’t affect the carp appetite too much and that at least one will be on the fishing mat.


I used pop ups of my own making (testing) and bought at the fishing store.

I used a naked helicopter system on both fishing rods. Instead of carp fishing lead I used a light method feeder lead (30gr or 1oz) filled with groundbait. I had already modified the feeder lead at home so that I could use it as a normal carp lead with a swivel.

Gusts of wind became more and more frequent and stronger. Hmmm , the wind forecast was for tomorrow. But maybe the weather scientists were wrong again.

Later I added some sweet corn to the groundbait and then fed each fishing spot with two groundbait ball and every half hour one smaller ball with fishing catapult (amazon link). Carp and similar related fish eat very little in the winter, so I adjusted the amount of food accordingly. Hoping that the food will tempted any carp or fish of any kind ?.

Hoping that the sun’s rays will awaken some carp to feed.


My boyfriend and my best fishing companion put some food around the lead, which later turned out to be a great decision. After 20 minutes the top of the fishing rod bent and a bite alarm sounded…..fish on ?. After a short fight, the mirror carp showed up ( heavy between 4 to 5kg or 8 to 11 pound), but luck didn’t last long as just before the landing net the hook got rid of it ?. Let’s try to catch another one…

When the sun hid behind the clouds it became cold.

Except for a few slight beeps, there were no more bites that day. It was getting dark and it was time to pack the fishing gear and go home.

Nevertheless, a wonderful day was spent by the lake and the view of the beautiful sunset at the end of the fishing day is invaluable to me.


Disclosure – if you buy anything using links found in this blog post, I may make a small commission. It doesn’t cost you any more to buy via these affiliate links – and please feel entirely free not to do so of course – but it will help me to continue producing content. Thank you.

Nowadays when fishing shop are more or less very stocked with a variety of carp fishing bait (pop up boilie, wafters, ready made boilies, hook pellet, frozen boilies, dumbell,…) today many people do not even think about doing the bait themselves.

Are we always satisfied with the carp fishing bait purchased at the fishing shop? My opinion and answer is no.

In my test I used a basic pop up mix to make pop – up boilies. But I added quite a few other ingredients to this basic mix. I can’t write recipe for this pop – up boilie mix, because unfortunately i just tried something without measuring the exact weight in grams. I know my mistake, which I will correct and write in the near future.

But I can write the names of the dry ingredients I added to the basic mix and you can try it for yourself:

I’ve added quite a few ingredients, but you don’t have to use everything in your mix. I like to try different ingredients so my mixes are sometimes very extreme.

Video How to make pop up boilie on my YouTube channel, to watch the video click below ??????:


Equipment for making pop up boilies:

  • fork, mixing bowl, towel or kitchen cloth, saucepan, kitchen mesh strainers or similar to capture boilies from boiling water, boilie rolling table or your hands ?
  • The first step is to crack one egg (or more, depending on the amount of pop up mix) of any size.


  • Mix the egg well. Air bubbles improve the buoyancy of a pop up boilies.


  • Mix all the liquid ingredients together.
  • Slowly add the dry mix, but not all at once.
  • I added too little mix so it looks liquid, so i add some dry mix.


  • Better to slowly add the mix until the paste is compact and no longer sticks to your hands.
  • The pop up boilie paste is made and I left the paste for about 24 hours. Otherwise, about 30 minutes is sufficient for the ingredients to bind and absorb the liquid.
  • Boilie I made by hand, without the use of bait rolling table and extrusion guns (even with such a small amount, this is not necessary).
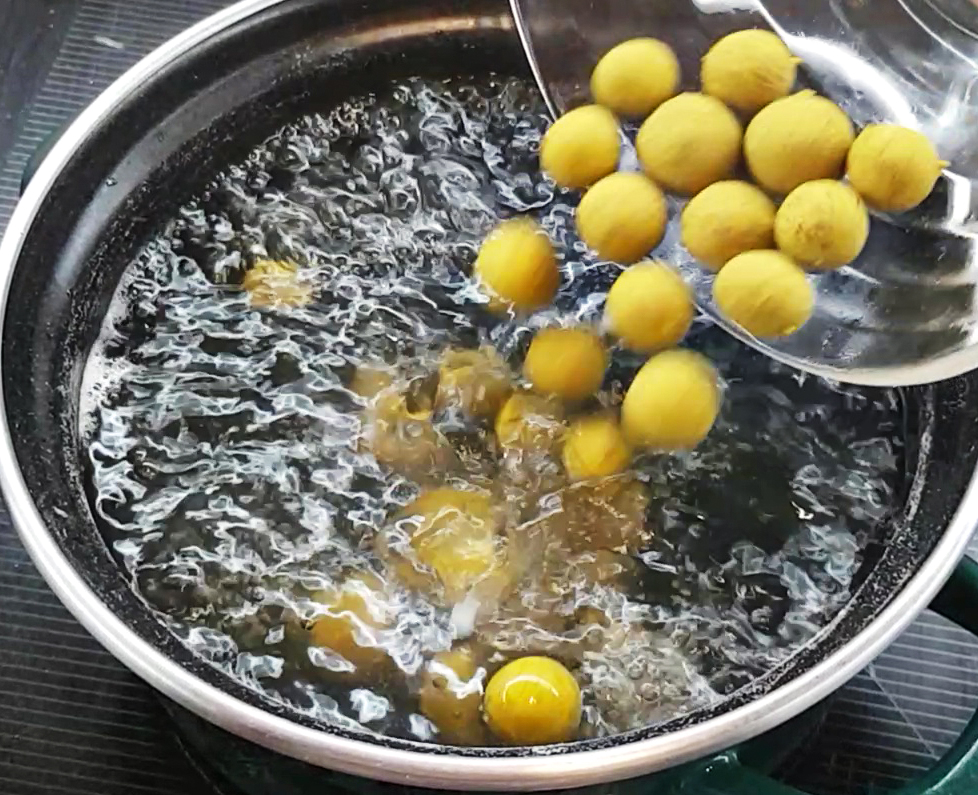
  • The water is already boiling and the boilies are ready for cooking.
  • Pop up boilies should be placed in boiling water and in such a quantity that the water does not cool when placed in boiling water (that the water is still hot and quickly starts to boil again).
boiling pop up
  • Boil for 1 – 3 min, depending on the size of the boilies (the larger the diameter of the boilies, the longer they boil). In my case they boiling for 1 – 2 min.


  • Place cooked on towel to cool and dry. Do not load boilies on top of each other, it is very important to cool them as soon as possible.
  • The pop up boilies will now dry about 3 – 4 days. Because there are no preservatives in boilies they will be stored in the freezer.
  • If you want harder pop – up boilies they need to be dried longer (at least 3 – 8 days). The drying time of the boilies also depends on the mix itself, the cooking time, the air temperature, egg size, moisture, … .

There is something special about catching carp on a boilie of your own making. It is true that it takes quite a bit of research and search for ingredients in different stores (fishing and grocery stores), but when you hear that beep and see the curved tip of the fishing rod, at that moment all the effort is paid off.

In one of my future blogs I will write about how successful my pop up boilies turned out.


Disclosure – if you buy anything using links found in this blog post, I may make a small commission. It doesn’t cost you any more to buy via these affiliate links – and please feel entirely free not to do so of course – but it will help me to continue producing content. Thank you.